One of the most effective ways to catch and keep new users for your mobile app is through survey localization. Instabug has been available in other languages for some time, but we’ve just added some new features! In order to give your users an experience that feels as comfortable and native as possible, we’ve made it possible to release surveys in multiple languages at once.
In this post, you’ll find an illustrated guide to deploying localized surveys with Instabug.
The process is straightforward. You have the option to add locales during the survey creation process. All you need to do is create the survey in your default language and then add the locales you’d like. You can make adjustments to the translations if needed. Then your user will receive the survey in the language that suits them best.
Setting Your User’s Locale
When you release a survey, it will automatically be displayed in the current locale of your user’s device, unless you’ve overridden it. You can set the user’s SDK locale with the following method: iOS, Android, React Native, Cordova, Xamarin. Once it’s set, they’ll see Instabug’s menu and all its buttons in their own language.
If you release a survey that isn’t available in your user’s locale, it will be shown in your default locale (this is set to English but can be changed).
Please remember that changing a user’s locale only changes the language of the Instabug SDK for the user. Your personal dashboard will still be in English.
Creating a Survey in Multiple Languages at Once
First, head to your dashboard and navigate to the Surveys tab. You'll create your survey and give it a name. This title won’t be seen by your users.
%20-%20Current%20customers%20(1).webp)
Add your questions, thank you message and routing preferences, if applicable. If you’re doing an NPS survey, by default, it will have two questions. The first is "On a scale of 0 to 10, how likely are you to recommend [App Name] to a friend?" The second question is a variation on "what can we do better?" You can add, edit, or remove questions as you see fit. Be sure to also check this guide to benchmarking NPS scores.
.webp)
Once you’ve got your first set of questions all ready to go, it’s time to add another locale. Hit the Add locale button on the top right-hand side of the page.
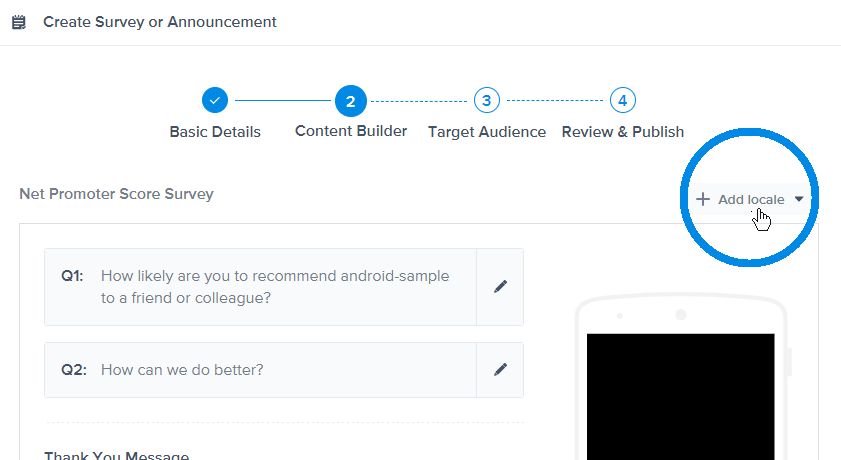
Let’s try adding French. You can select a language from the dropdown menu or type it into the search bar.
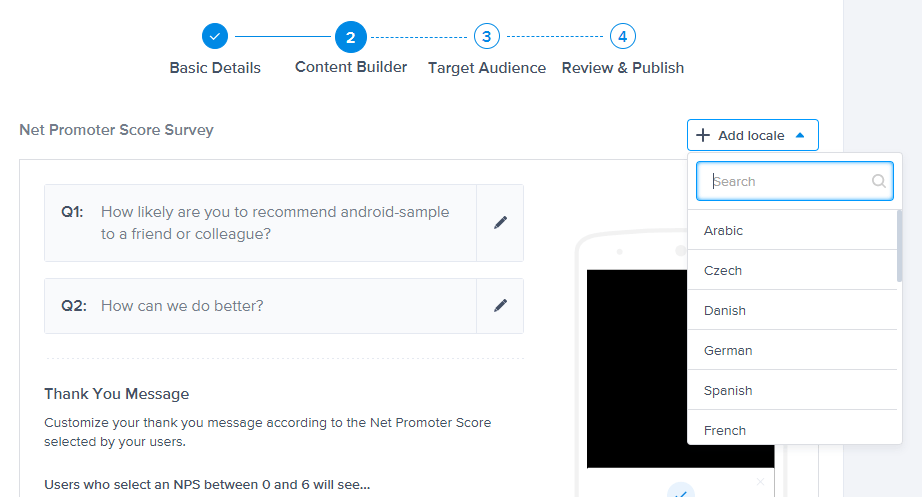
Great! French has been added as a locale. Now that you’re using multiple languages, you’ll see that your surveys are tabbed at the top. As you add more locales, you’ll see more tabs appear.
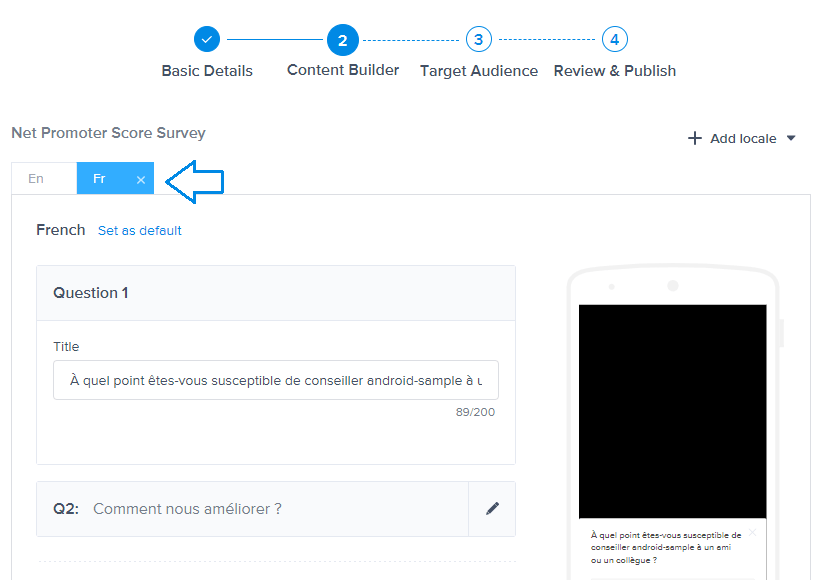
NPS questions will be translated for you automatically, but if you’re sending a survey with custom questions, you’ll need to provide your own translations. If you want to adjust your NPS questions too, that’s okay! You can still edit the text in the question field.
You’ll also see that you have the option to choose a default locale. If your user’s device locale is set to one that you do not have, your survey will be displayed in the default locale. To change the default language, you would click on Set as default. Once you change your default locale, it will move over to take the leftmost place in order.
As you add more locales, you’ll see your tabs expand. If there are too many to view, you’ll be able to scroll through them to find the locale you’re searching for.
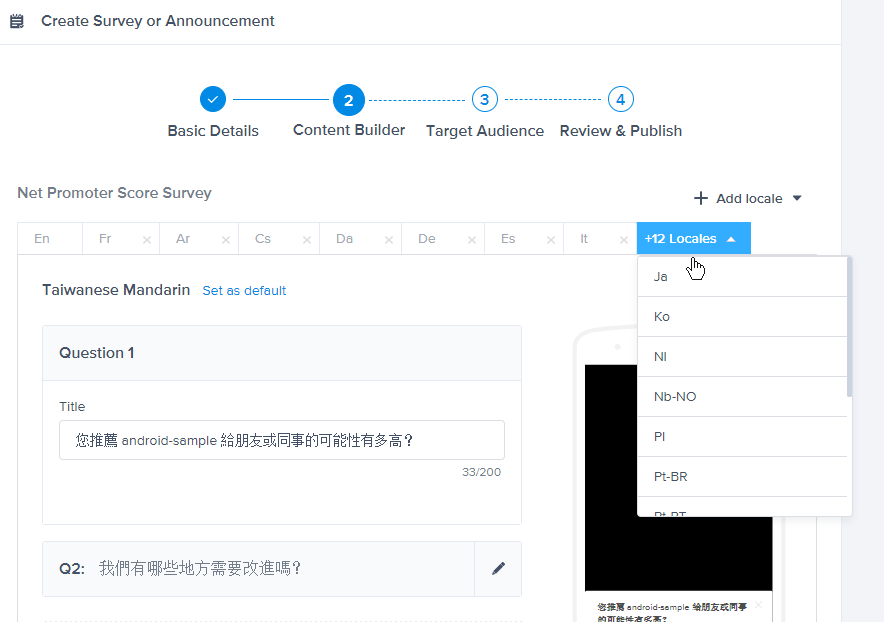
Please note that all localized instances of your survey will have the same number and types of questions as your default locale. You won’t be able to add or remove questions. Keeping them consistent is what keeps your survey analytics intact between locales. If you’d like to release different variations with distinct questions, you can start a new survey for each version.
If you accidentally delete any of the question text, you’ll see an error message on the tab. You’ll need to go back and fix the error before you can complete your survey.
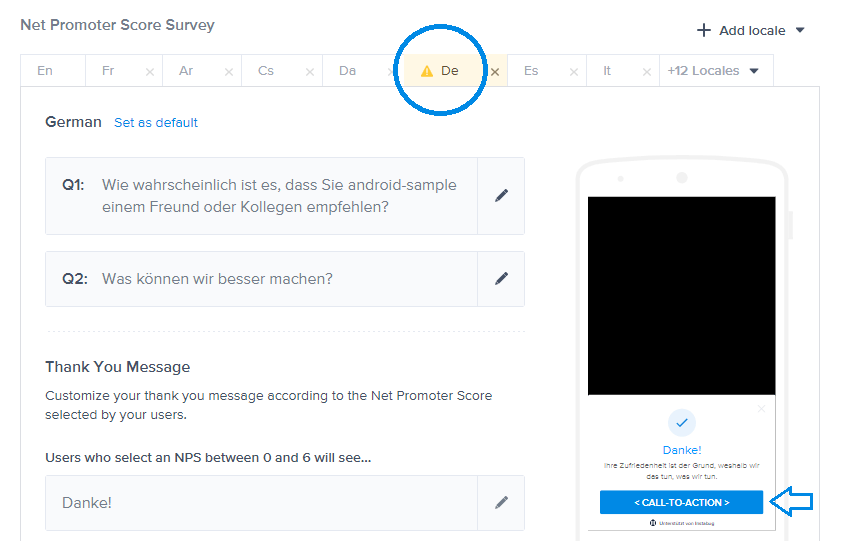
You'll see a yellow error icon that alerts you that something is missing. A quick check shows that the button’s call to action text has been deleted, resulting in the blue button being labeled with unsightly default text. A quick moment to replace the text was able to clear the errors.
Once you’re done choosing locales and editing as needed, you’re ready to move on. Scroll to the bottom of the page and hit Next.

Targeting Your Survey Audience
That’s it! Your localization settings are all done for this survey. The final survey steps are targeting and review. For this survey, I’ve chosen that I want all my free users to see it after they’ve logged in. Always remember to target your survey recipients. Have a clear objective and target audience in mind when you ask specific questions — remember, the more relevant the question is, the more likely a user is to answer it.
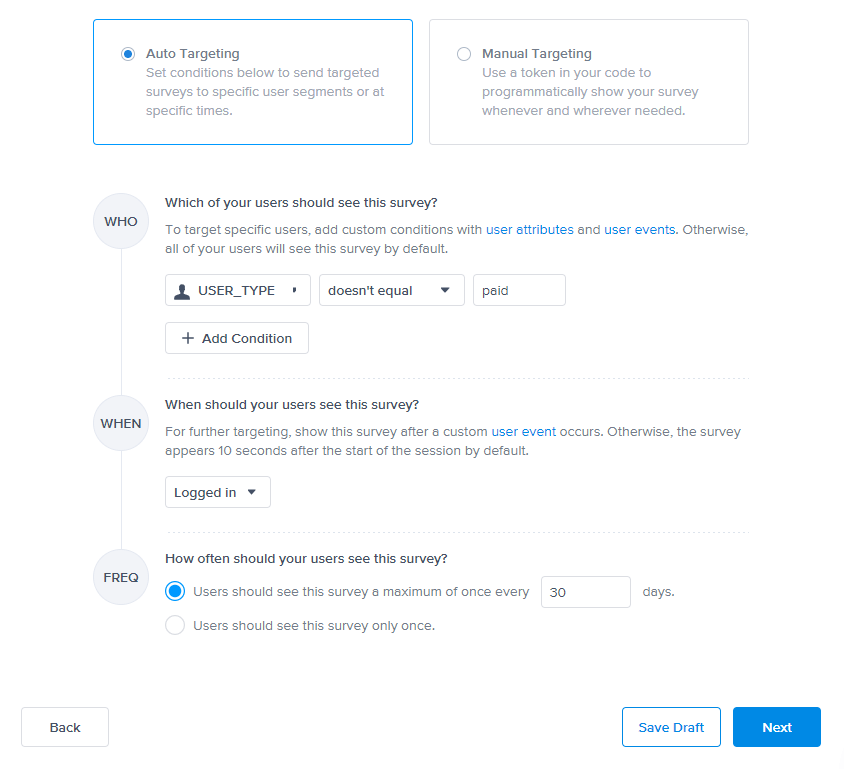
Once you hit Next, you’ll be taken to a final review page. You’ll just look over your questions and approve the survey at the bottom of the page, and you’re good to go!
Nice work! You’ve just released a survey in multiple locales without writing any extra code.
Learn more:
- In-App Surveys Product Tour
- How to Target and Segment Audiences With Instabug's In-App Surveys
- How to Customize the UI of Your Instabug Surveys
- Forwarding and Reply Automation for In-App Support Messages
Instabug empowers mobile teams to maintain industry-leading apps with mobile-focused, user-centric stability and performance monitoring.
Book a demo to see how Instabug can help your app


