So you have a solution to a problem that many other iOS developers have and you want to help them, but you also want to protect your code and build a business? Binary framework. That’s what you want!
You might have noticed that you can't see the source code of the UIKit frameworks you use to build your iOS apps on top of every day. That’s because Apple ships the UIKit as a binary framework in its iOS SDK.
If you’re distributing a framework that contains intellectual property, this is the way to do it.
Binary Frameworks
A binary framework is already compiled source code with resources with a defined interface that you can use in your apps. It comes in two flavors: a static library and a dynamic framework. In this article, we'll focus on dynamic frameworks.
I will walk you through creating an iOS binary framework and (spoiler alert: here comes the real tricky part...) distributing one.
We have quite the experience with this as we have been distributing the iOS Instabug SDK as a binary framework for many years now, through many changes (static to dynamic) and tools (migrating to CocoaPods), and from recently shipping one monolithic framework to two frameworks.
So let’s get to it.
Setup
- Creating a Demo App
Creating a Binary Framework
- Explaining What Just Happened
- Adding a Very Basic Function
- Using Your Binary Framework in Your Demo App
- Recapping What You Just Did
Distributing a Binary Framework
- Exporting Framework
- Creating a Second Test App
- Integrating Your Binary Framework in Your Test App
- Publishing Your Test App
- Recapping What You Just Did
One More Thing
A good practice is to always have a demo app for your binary framework. This will make testing your changes easy and quick in an environment you already familiar with. Let’s start by creating a simple iOS app.
Creating a demo app
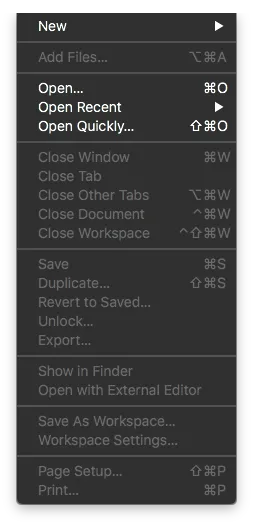
Open Xcode and select New from the top menu.
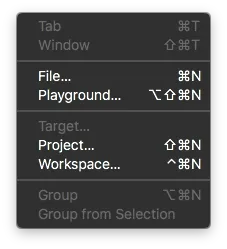
From the submenu, select Project.
Choose Single View App and select Next.

Set Product Name to "HelloDemoApp" and select Next.
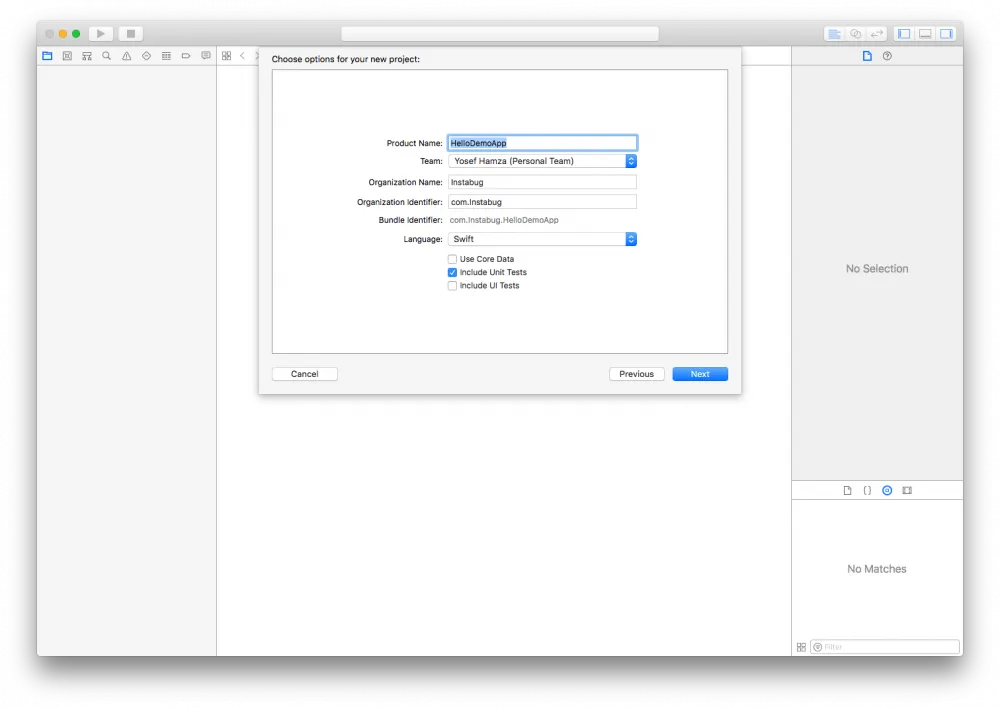
Choose your preferred destination for the new project.
Congratulations, you just created your demo app!
Now that you have your demo app in place, let’s add your new binary framework.
Go to HelloDemoApp.Xcodeproj -- the first file in the project navigator panel.
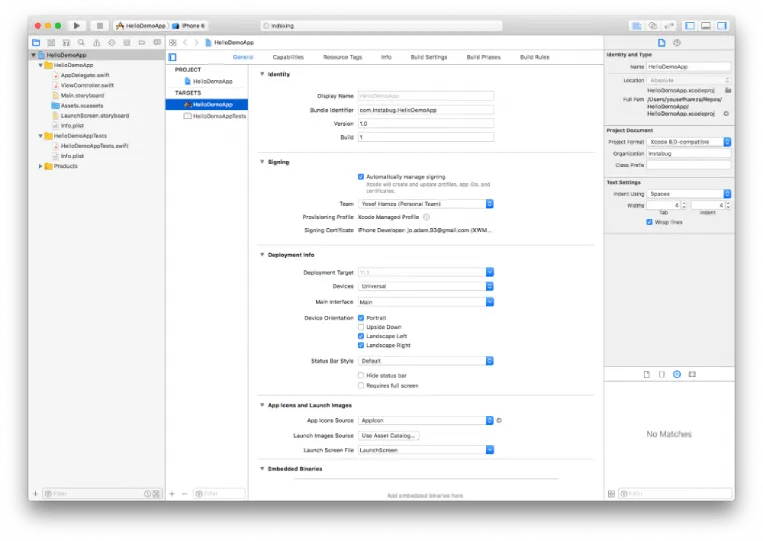
Make sure the project navigator panel is expanded to find TARGETS which will list your apps. That’s how Xcode organizes its files: Workspace > Project > Targets.
Targets have compiled sources (source files) and source files can be shared with other targets in the same project.
Each target produces a Product. In the case of an app, the product is your app.
Select the '+' icon to add a new target.
Scroll to the Framework & Library section.
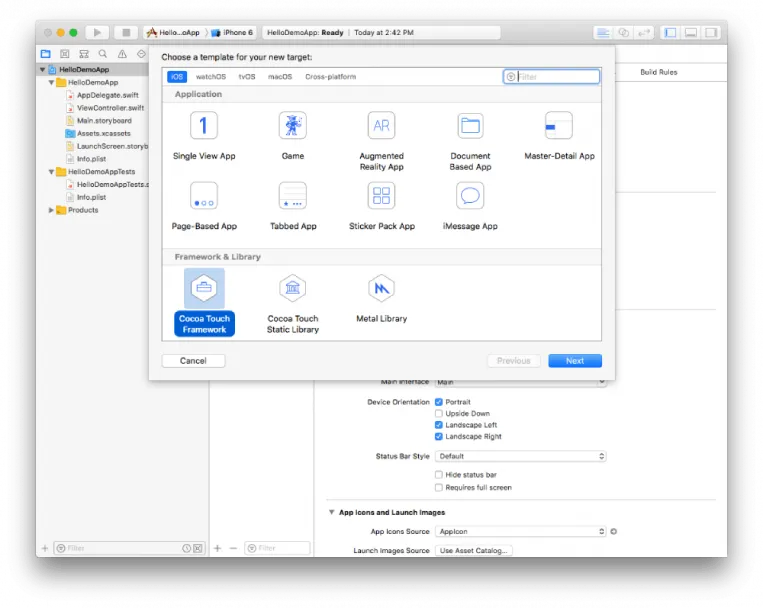
Choose Cocoa Touch Framework then select Next.
Set the Product Name to "HelloLoggingFramework" and make sure the language is set to Objective-C then select finish. (Don’t be scared -- this article is about the setup, not the code.
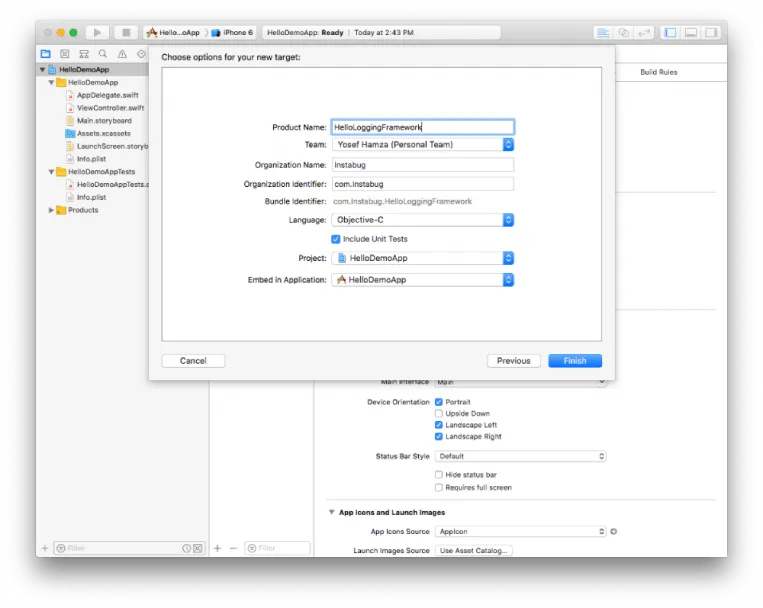
Explaining what just happened
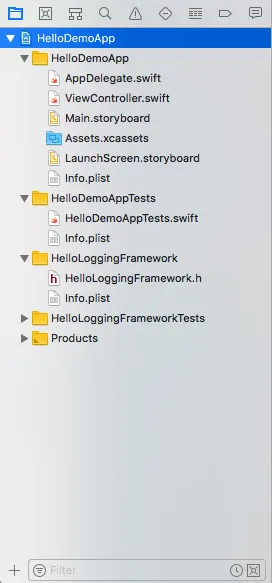
You should now see two new targets below your app in the left-side menu: HelloLoggingFramework and HelloLoggingFrameworkTests.
You should also see two new directories in the project navigator panel on the far left with the same names. Xcode has generated two new targets for you: the framework target and a unit test target for that framework.
If you expand the HelloLoggingFramework directory, you will find two files: Info.plist and HelloLoggingFramework.h -- the latter is the umbrella header file that will be used to communicate between your framework and the host app (written in Swift or Objective-C).
Adding a very basic function
Next, let's add a class to your new binary framework.
Create a new class
Right-click on the HelloLoggingFramework directory in the project navigator panel.
Choose New File… from the menu.
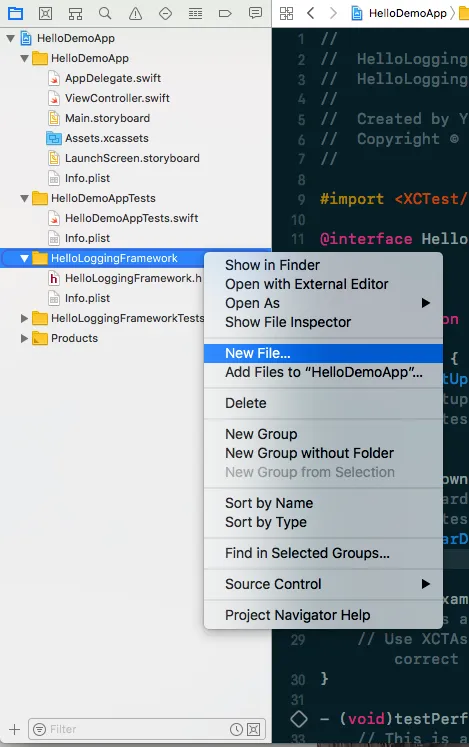
Choose Cocoa Touch Class and select Next.
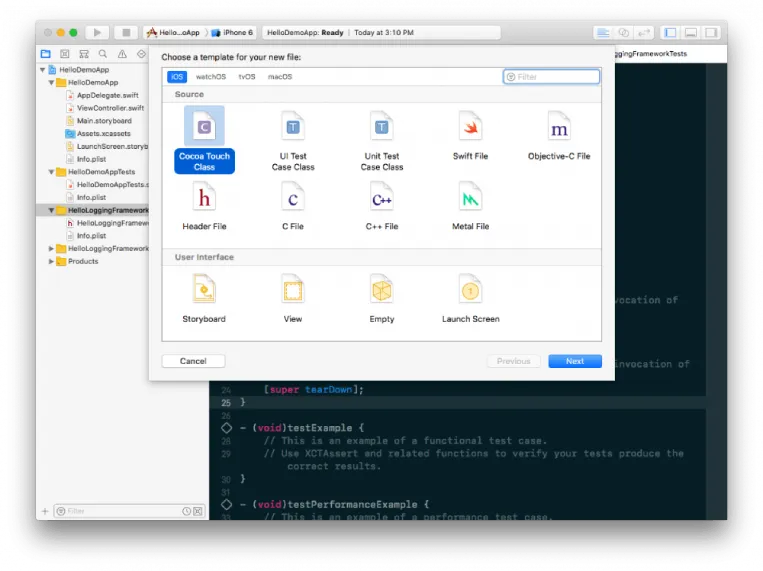
Make sure you set:
- Class: "HelloLogger"
- Subclass of: "NSObject"
- Language: "Objective-C"
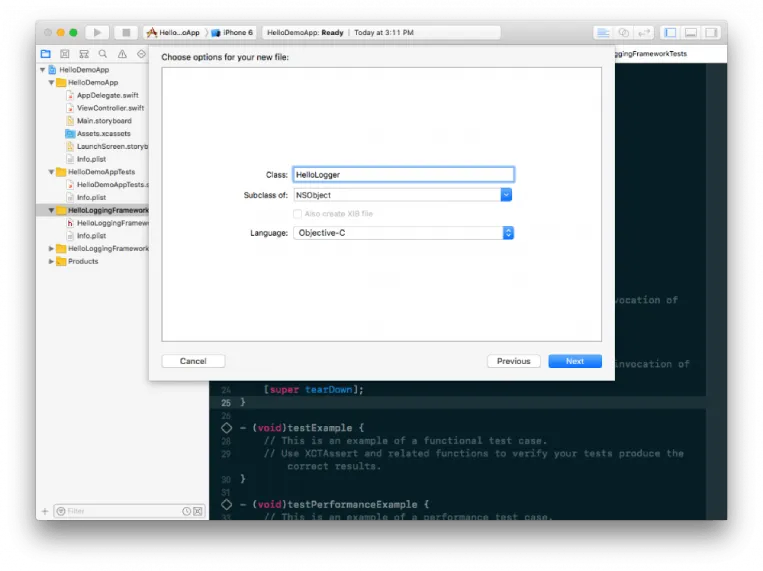
Select Next then Create.
Add a single method to that class
Open the HelloLogger.h file and add this line:

Then, open HelloLogger.m and add this snippet:

Using your binary framework in your demo app
Next, we will use your new binary framework in your app.
Open ViewController.swift in your HelloDemoApp directory in the project navigator panel.
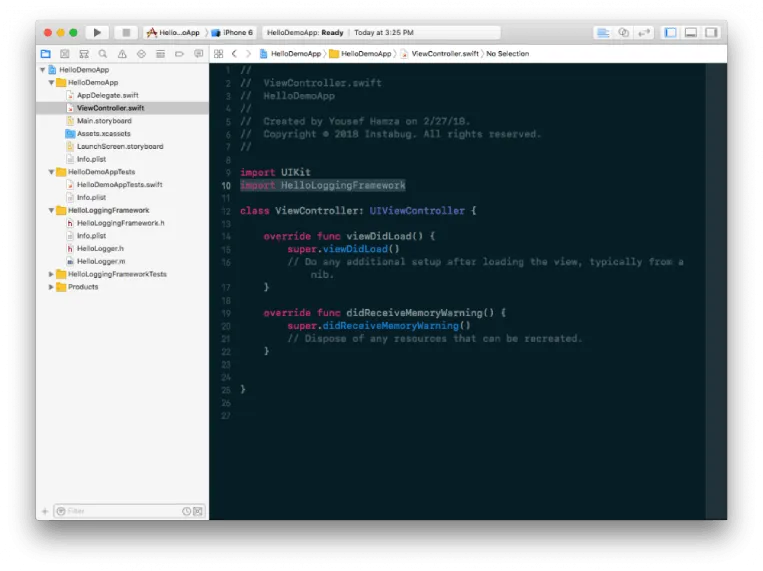

OOPS!
Make your class public
Select the HelloLoggingFramework target from the left-side menu.
Select Build Phases from the top bar.
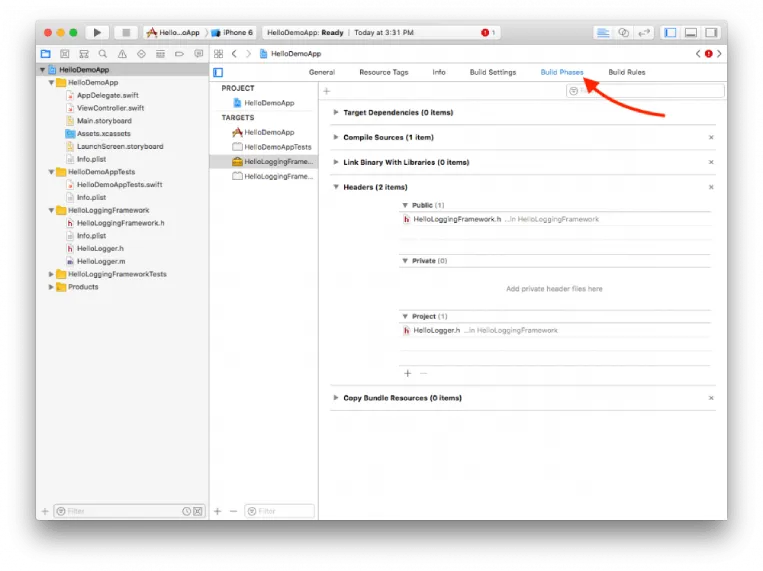
Expand the Headers section.
Now let’s go back to ViewController.swift from the far left project navigator panel and check that error again.
Still there. ?
Remember that HelloLoggingFramework.h? Let’s take a look at it.
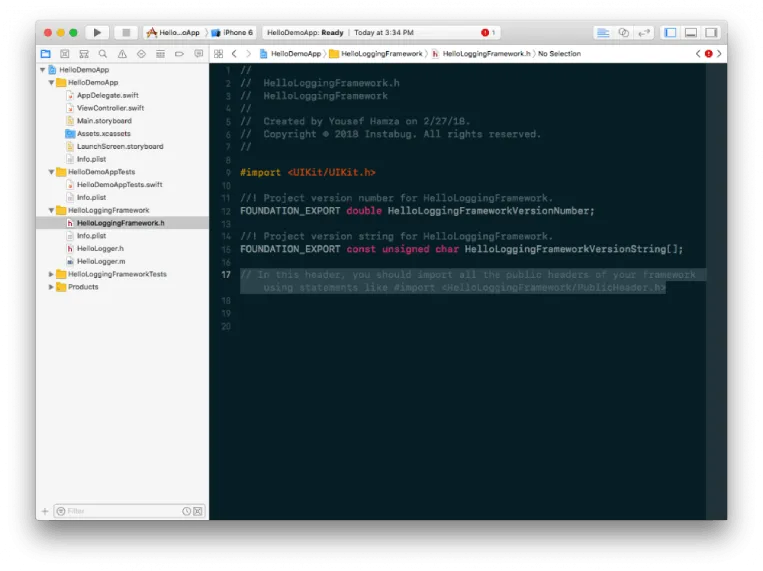
It says:
So let’s add this:
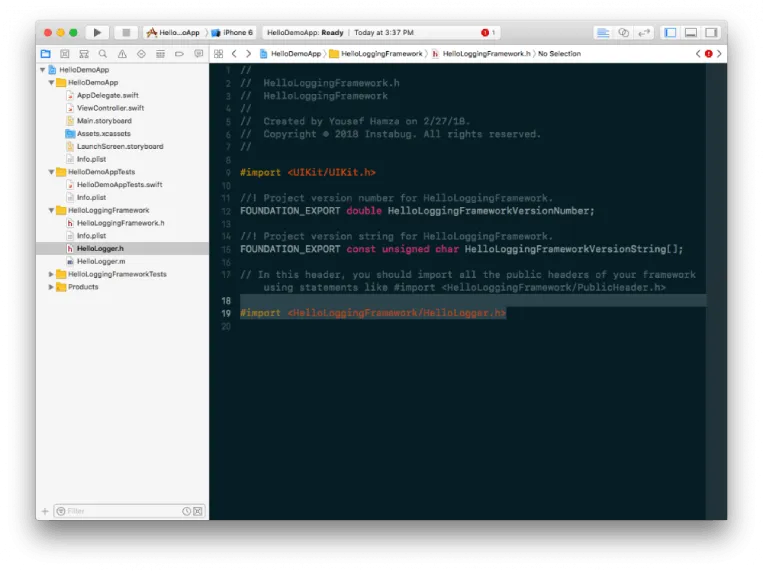
Now, let’s head back to ViewController.swift. The error is gone.
Next, let’s actually use that class.
Add this line:

Run the demo app and check the console at the bottom right.
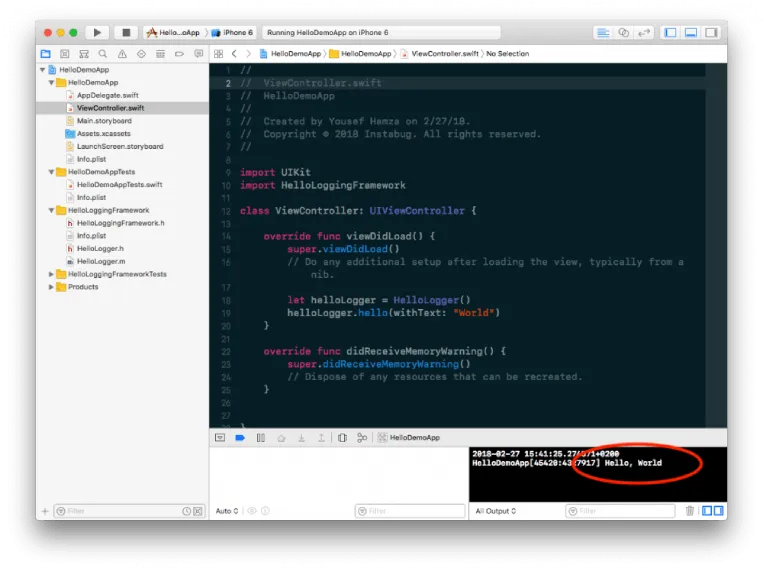
Good job!
Recapping what you just did
- You created a demo app.
- You created a binary framework to use in your app.
- You added a class to this binary framework.
- You exposed that class to use in your app.
- You called that class from your binary framework to your app.
Now you have a perfect setup for developing your binary framework, but how about sharing that functionality with others without sharing the code?
In this section, you will distribute your binary framework to a second app, but first we need to export your binary framework.
Exporting your framework
Select your HelloLoggingFramework target from the Schemes menu at the top of Xcode.

From the Product menu at the top bar, select Clean, then select Build.
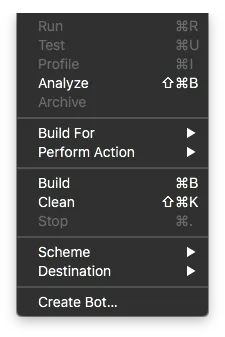
Find your binary framework by expanding the Products directory in the project navigator panel. Right-click on HelloLoggingFramework.framework, then select Show in Finder.
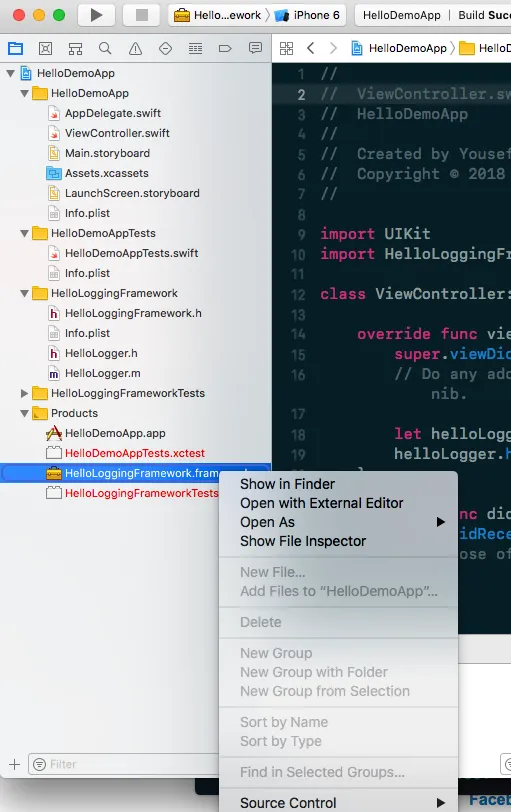
Grab your binary framework file HelloLoggingFramework.framework and save it somewhere you can access later.
Creating a second test app
You will now create another iOS app.
It’s a simple Single View App, like the one you created before.
Let’s call it "TestApp". This app will be for simulating your users' integrations.
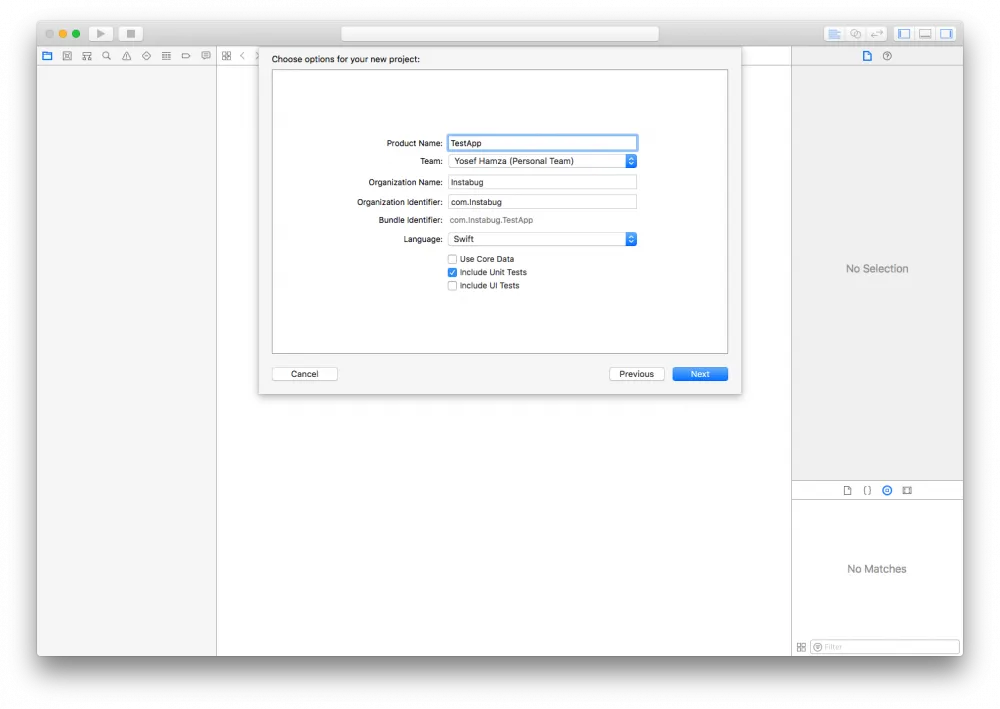
Run your test app to make sure everything is working fine.
All good? Great.
Integrating your binary framework in your test app
Drag your binary framework file HelloLoggingFramework.framework and drop it into your TestApp directory in the project navigator panel.
You should see this prompt:
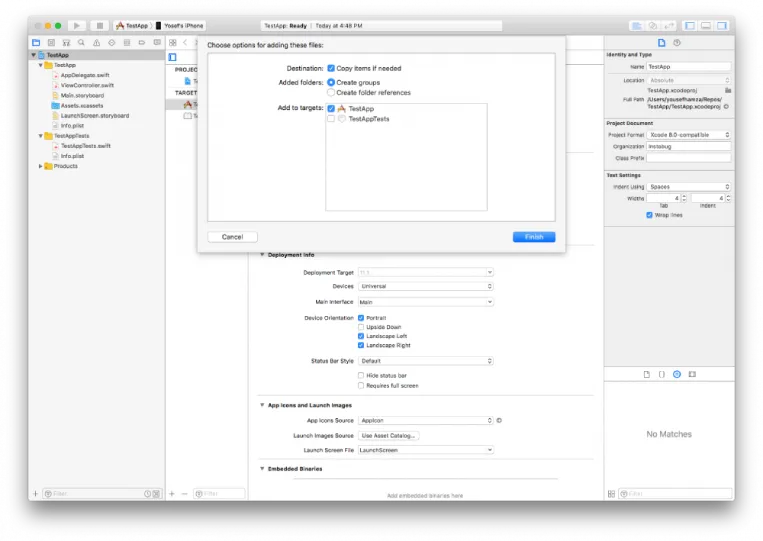
Select Finish.
Now, go to ViewController.swift and use your binary framework like before.
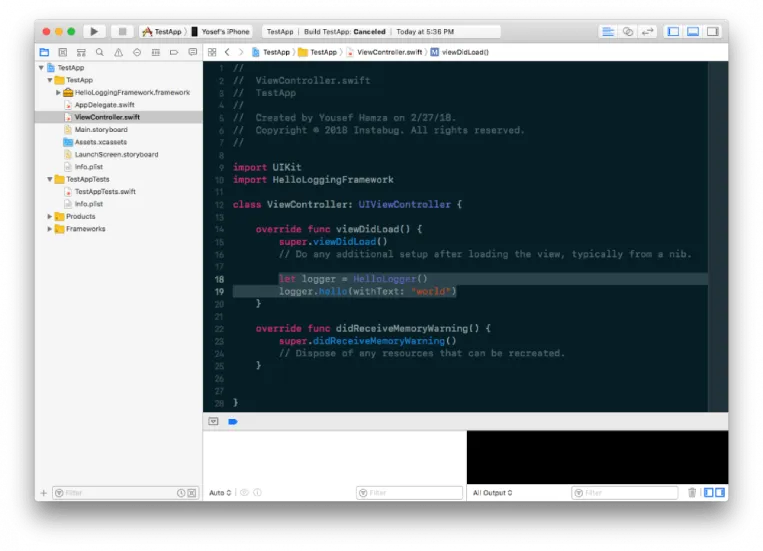
Run your app.
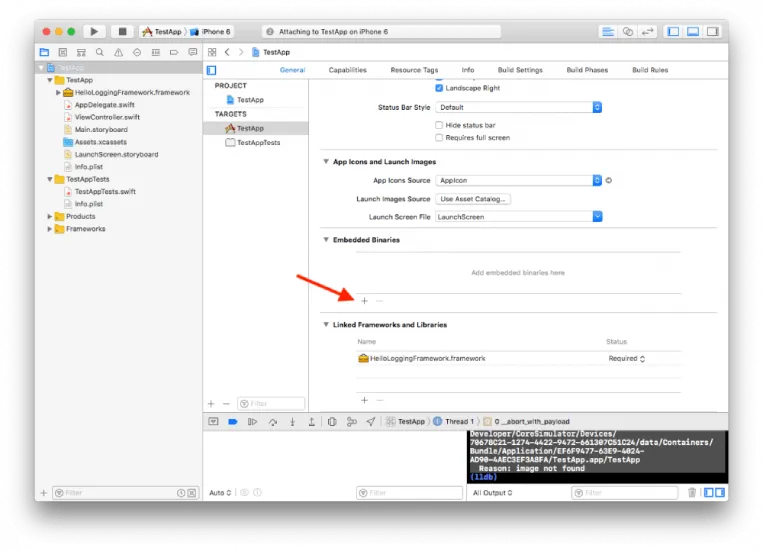
If you see this error below, it’s because your dynamic framework needs to be embedded in your app.
You can do this by selecting TestApp.Xcodeproj from your project navigator.
Then, select your TestApp target.
Add your binary framework in the Embedded Binaries section.
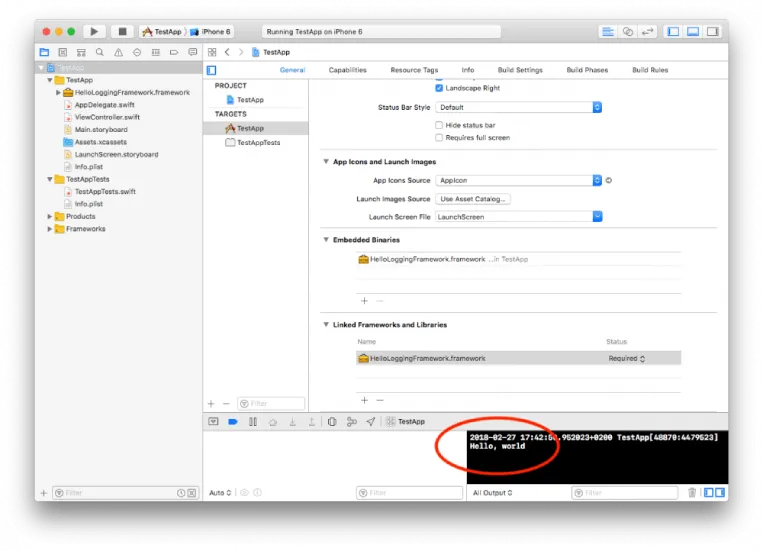
Run your test app.
Everything works and console logs are just as expected.
Publishing your test app
When you publish your framework out there for other people, you should consider their usage end to end.
In the Schemes menu at the top of Xcode, choose a physical device or Generic iOS Device.
From the top bar, select Product > Archive.
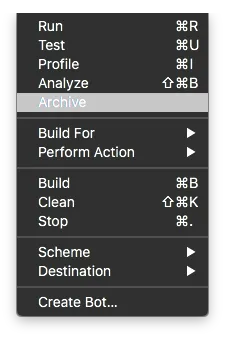
Error?
So what do we do?
Introduce an aggregated target
You have been introduced to the framework target, now we will introduce a new target: the aggregated target.
Let's go back to our original project (demo app + framework).
In the top bar, select File > New > Target.
In the Cross-platform section under Other, choose Aggregate. Select Next.
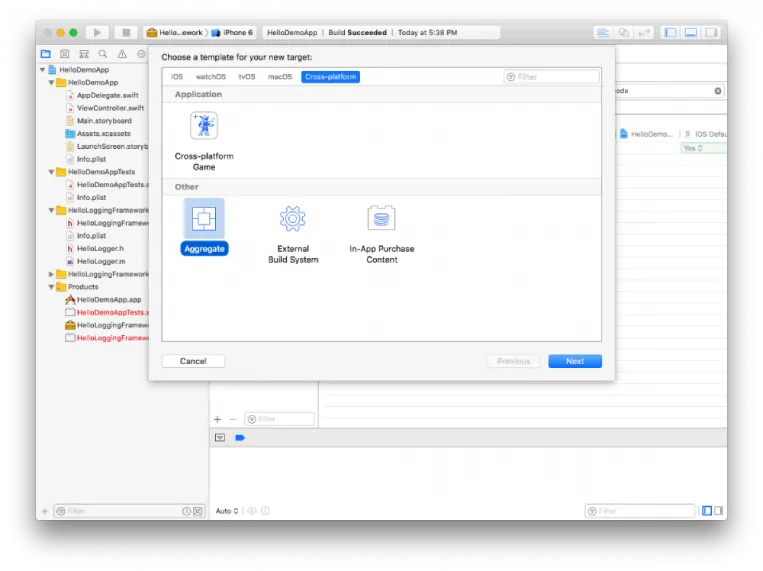
Let’s just call the Product Name: "Framework". Press Finish.
First, we need it to run with the release configuration.
Open the Schemes menus and choose your new Framework scheme.
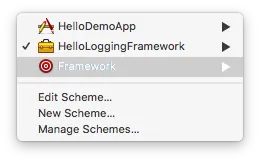
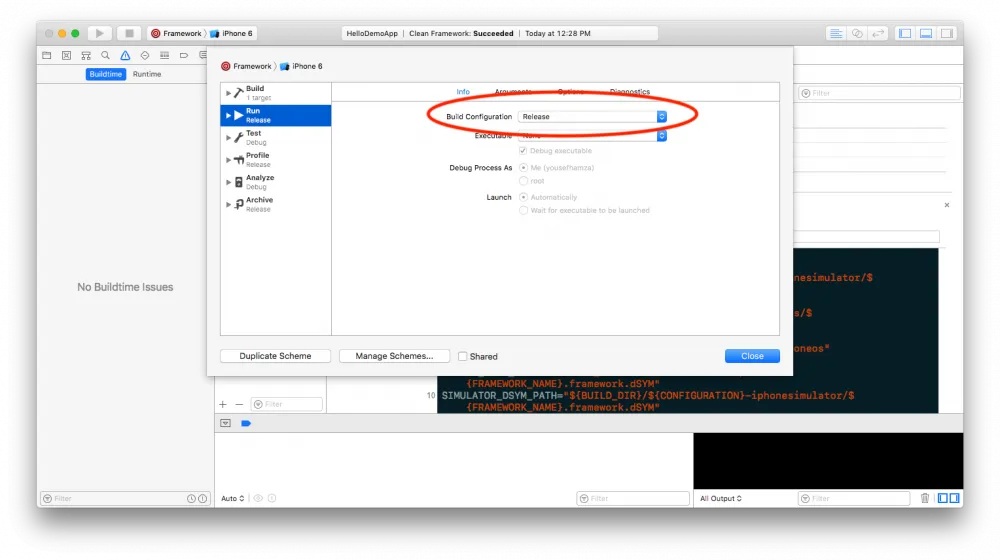
Then, open it again and choose Edit Scheme….
From Run, set Build Configuration to Release.
Now, in the just created Framework aggregated target, let’s go to the Build Phases tab.
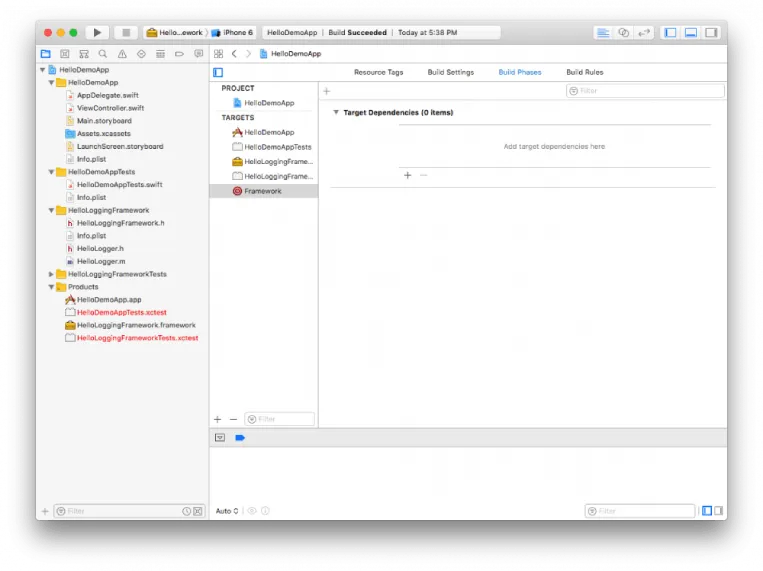
Add your binary framework to the Target Dependencies section.
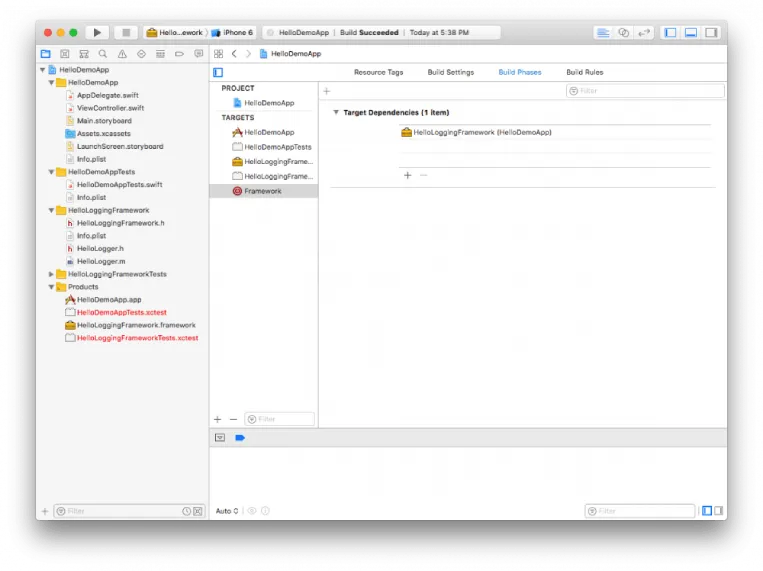
Now for a new trick. We will add a build phase.
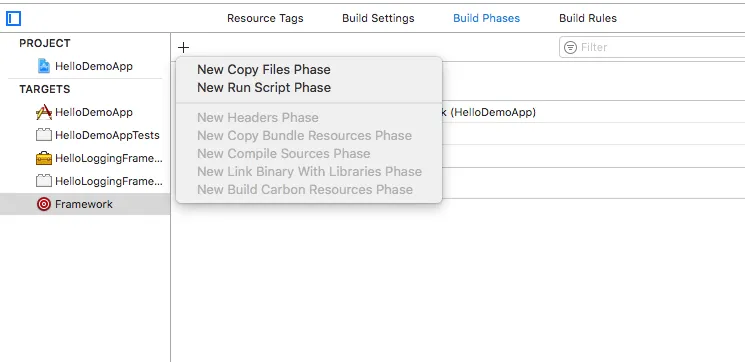
Select New Run Script Phase.
Let’s write that script!
LIPO
Note that in this step, we will archive the frameworks, not only build them. We need to do this to get the ". bcsymbolmap" files. These are needed with the framework and its dYSMs so when Apple rebuilds your framework on iTunes Connect, you can get the final dYSMs of your framework for your favorite crash reporting tool to symbolicate your crash reports.
In the following steps, we will be working with lots of paths, so it’s easier to create and store them in some variables. Add the following snippet to the top of the script:
Then add this line to your script:
This builds your framework for the target simulator.
Add the following line to your script, too:
This builds your framework for the device.
After creating the frameworks, let's continue with your script.
Let’s clean up the final directories:
Now, we take one of the framework files to our universal folder:
Note that here, we actually want all the framework files from the device product, but it’s the binary only that we need to merge.
That will merge the binaries of the simulator product framework and the device product simulator and copy the result to our output directory.
Now we actually need to do the same with dYSMs files and add the result to that framework at the output directory.
And this magic snippet:
What this does is two things:
1. Copies the ".bcsymbolmap" file to our output directory.
2. Fixes an issue where some symbols on your crash reports after symbolication appear hidden.
Here's the full script:
Now run your aggregated framework target and check your project directory.
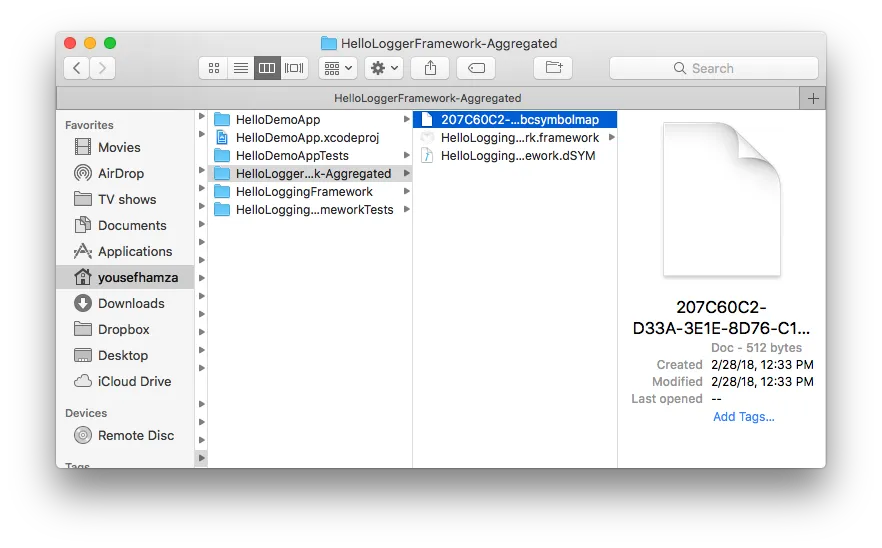
Let’s go back to our TestApp:
- Remove the old framework.
- Add this new one to the Embedded Binaries section just like we did before.
- Make sure you Clean first from Product, then run.
- Try on both simulator and a device and check.
Simulator works!
iOS Device... well, it depends.
Architectures
So if you need to, do this:
Open your binary framework project HelloDemoApp.Xcodeproj, then navigate to the project menu.
Choose HelloLoggingFramework from Targets.
Open the Build Settings tab and press All.
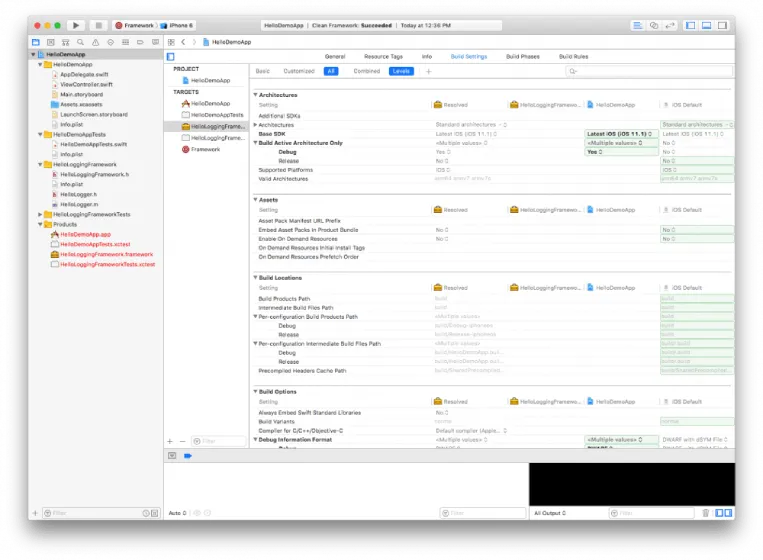
Under Deployment, change the iOS Deployment Target to a version below iOS 11.

Amazing!?
Now you have a fully production-ready framework. That’s your canvas. Add the functionality that you and (hopefully) others want, and share it with them.
Recapping what you just did
- You exported your binary framework from your development project.
- You built a test app.
- You integrated your binary framework in the test app.
- You created an aggregated target.
- You used LIPO to make your binary framework support both simulators and devices.
If you upload your app to the Apple App Store, you will get an e-mail with a warning:
If you published your framework with CocoaPods, CocoaPods will take care of the above for you. If not, you will have to add one extra step: adding a Run Script Phase to Build Phases, like what we did with the aggregated framework before, with the following script:
I hope you came eager to distribute your awesome idea that contains IP in nice packaging: iOS binary frameworks. Now you have the knowledge to go ahead and expand your development horizons. There’s more than you can create on the iOS platform than just apps! Good luck.
Learn more:
- How to Create and Distribute an Android Library
- Best Practices for Developing a Mobile SDK
- Our Android Team's Guidelines for Developing an SDK
- Creating UI Elements Programmatically Using PureLayout
Instabug empowers mobile teams to maintain industry-leading apps with mobile-focused, user-centric stability and performance monitoring.
Book a demo to see how Instabug can help your app


